![]()
|
|
|
So you read Papa Doc’s Aunt Mary’s Guide to BVR, but your still getting smoked in Beyond Visual Range (BVR) combat? Well, sit back and I’ll fill you in on some of the BVR knowledge I’ve acquired through many hours of BVR Flanker play and my professional experiences.
First off, remember that the type of missiles being used will dictate how the battle is fought. To illustrate this, I’ll take each category of missile (based on seeker type) and investigate the do’s and don’ts. I’ll intersperse other tid-bits regarding missile avoidance, baiting, and warning indicators. I don’t pretend to be the know-it-all of BVR, and I welcome comments and further discussion. I sincerely hope that the following will be of help and interest to those of you still struggling with intricacies of BVR combat.
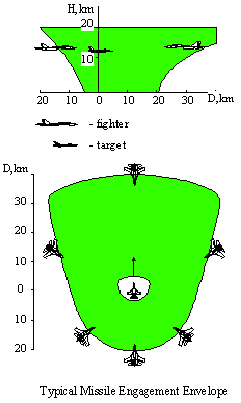
The SARH missiles (a missile that requires you to illuminate the target aircraft the entire time of missile flight) for your use in Flanker include the R-27R (AA-10A ALAMO) and R-27RE (AA-10C ALAMO). The only difference between the two is that the RE has a larger motor, thus giving it a longer reach (i.e. provides you with a larger F-pole if used properly, we’ll get to this shortly). Except for the R-33 (AA-9 AMOS), the R-27RE—and the R-27TE--has the longest reach in Flanker. It is this long reach that can be exploiting for deadly affect if used properly. The primary drawback to the R-27R/RE is that, like all SARH missiles, they require you to keep your target locked the entire time of missile flight. So how do you go about taking advantage of the "long stick" R-27RE? The best way to illustrate this is to diagram a target engagement. During the course of this diagram, I will also be illustrating the use of off-angle targeting and speed differentials to increase you F-pole--the distance between your aircraft and the target aircraft at missile time-out.
Contrary to was what written in Aunt Mary’s, there is NO advantage to coming into the engagement at a higher speed than your adversary. Regardless of your air speed versus your opponents, both aircraft will reach RMAX (the maximum distance at which the selected missile can be fired and reach the target given the targets current heading and speed) at the same moment. So what’s the advantage into going into the fight faster than your adversary? None. That being said, it’s best to go into the fight at a speed with sufficient closure to ensure a large RMAX (the higher the closure rate, the larger your
RMAX) yet not significantly faster than your opponent because it will give him an advantage in getting slower faster (I’ll elaborate on that in a bit). As a rule of thumb, I generally come into the fight at approximately 800 iKPH. Going slower may not be a wise option if you choose to go into a bait maneuver (to be discussed later).
Upon reaching RMAX with R-27R/RE, it’s best to fox (generic term for an AAM shot) twice due to one AAM not necessarily killing the bandit every time. Also, if the bandit defeats the first missile he may assume there is not a second in trail and will attempt to crank (a high G turn) back into you to go sensor nose on (bringing the aircraft sensors—radar, IRST, missile seekers to an azimuth capable to detecting/tracking target.) Sorry for all the work jargon.
After foxing, you primary goal is to maximize your F-pole. We do this by two means: off-angle closure and speed kill. Once done foxing, put the brake out, put the flaps down and cut throttle to idle. At the same time crank hard into a nose-high (20 degree works well) bank. During the course of the crank it is imperative to retain lock of the target. Remember, that if you lose lock, any missile you have in the air will go dumb and explode harmlessly. Keep an eye on your MFD and bring the locked bandit to approximately 60 degrees right/left of center and then roll level, yet nose high. Now that we have the bandit still locked up at the gimbal limit of our radar, we are nose high with brake and flaps out, and we will be bleeding speed like a stuck pig. The reason to keep the bandit at your gimbal limit is to increase the distance any AAMs your adversary fired will have to fly. By flying with the bandit locked at gimbal limit, your forcing the enemy AAM to fly a curved flight path, and as we all know: the shortest path from A to B is a straight line, not a curved line. By concurrently cutting our speed, we are decreasing the closure rate between our aircraft and the incoming missile. What this all amounts to is that—assuming the bandit continues to fly a pursuit/high speed intercept—our missiles will arrive on him before his can reach us. (Note: There are two ways to tell if you killed the bandit, 1-fast decrease in alt, 2-sometimes you will be given an audio impact sound.) What this forces the bandit to do is either take the hits, and likely die, or go defensive to avoid your missiles and thus lose lock and have his missiles "go dumb". Again, we are assuming the bandit fired the same missile as us—either an R-27R or R-27RE.
So lets say you enter a BVR fight in which both you and your adversary are equipped with R-27R/RE, and despite your best attempts to win the F-pole fight you hear that dreaded missile proximity warning klaxon. How do you avoid that incoming missile? (Note: Just because you hear the proximity warning indicator, does not
necissarily mean that the missile coming towards you is in fact guiding on you. There have been many instances where I have destroyed the bandit after he fired an SARH missile, but I still get the warning despite the AAM not guiding on me.) The first thing to do is put the enemy aircraft that launched the missile on your three or nine o’clock line. This is termed flying the notch. Pulse Doppler (PD) radars rely on a velocity change difference between background and the target in the main-beam lobe to detect the target. By flying perpendicular to the PD emission vector, you provide no discernible velocity change from the background to be locked by a radar in a high PRF mode. Depending upon the sophistication of the PD radar, it will vary in the size of its "gate" (the positive or negative rate-change velocity if not flying truly perpendicular) in regards to background by as much as 200 iKPH. Once you are flying perpendicular to the enemy’s radar emissions, you will want dispense chaff/flare at maximum interval-rate and assume a 15 degree nose high aspect. Then, slew your view toward the direction of the incoming missile and attempt to attain a visual tally of the incoming AAM. Initially, the missile will be visible from its motor smoke (if within visual range). The missile itself will start out as a small dot, then grow to a small "plus, + " sign, then turn into a rapidly closing white sparkle. At the moment you see the missile turn from the small plus sign to a white sparkle, initiate nose high 4 G bank into the missile. I have yet to have a missile achieve even a proximity hit on me with this method. I’m sure there are other methods—perhaps better—but this one works well for me. Additionally, as long you continue to fly the notch, or put the bandit at your six o’clock, he will be unable to attain radar lock in H2H. This is a means of achieving closure without fear of an incoming AAM. However, this puts one in a defensive role and this is not advisable against a skilled BVR player.
There are three primary warning indicators to let the player know of incoming AAMs. As mentioned above, the smoke of motor burn is a sure give-away of an AAM coming your way—if your within visual range. The second warning indicator is your Radar Warning
Receiver (RWR) gear. The primary aspect of the RWR gear we’re interesting in regarding BVR is the lock on tone. When this tone is active, we must assume an AAM is inbound if we believe the bandit is within its Weapon Employment Zone (WEZ). The third is the Infrared Launch Detector (ILD). How the ILD works in Flanker is more as a missile proximity warning indicator—not realistic. When this indicator sounds, a missile will impact on your aircraft within 1 to 8 seconds--depending on range at which the missile was fired. If you still in a BVR situation, begin evasion maneuvers as stated above.
Rather than enter into an F-pole fight, one can attempt to lure one’s opponent into wasting his AAMs on low PK shots. In turn, once your adversary has depleted a certain category of AAM, the player can then turn the tables and use such AAMs without worry of the bandit replying with equivalent AAMs. One example of a bait would be as follows:
Upon reaching RMAX in a situation where both players are equipped with R-27RE, R-27T, and R-73, it would be presumable that the opponent will fire off one or two R-27RE. Rather than respond in kind and enter an F-pole fight, you could immediately enter the notch after RMAX. By entering the notch, we will break the adversaries lock and thus his incoming R-27REs will go dumb and detonate. With this accomplished, one can crank back into sensor nose on and fox R-27RE knowing that he will not be able to respond in kind until reaching RMAX for R-27T.
Another option would be to put the bandit on your six o’clock. There is a bug in Flanker that prevents AAMs from successfully engaging targets using chaff/flare from their six. Not until one is VERY close is it possible for a six o’clock AAM shot. With this in mind, it is possible to keep the bandit at bay on your six and have them deplete their AAM load on unsuccessful shots. Once the bandit is depleted of AAMs, the player is free to engage the bandit with a distinct advantage.
A final form of baiting is the use of E-pole. E-pole is defined as the distance one can turn away from a bandit while still staying out of its WEZ. Such a scenario would involve flying into the outer WEZ of the bandit, assume he has foxed, and then turn tail 180 degrees and extend. The fired AAM by the bandit will then be unable to cover the "new" distance given to it and detonate harmlessly when it runs out of steam.
The one ARH missile (an AAM which carries on board its own radar illuminator) for our use in Flanker is the R-77 (AA-12 ADDER). Like the AIM-120 and active radar MICA, the R-77 gives us the option break radar lock with the target before missile time-out. The key here is to retain radar lock until the missile’s seeker has gone active. One may want to maximize the distance between one’s aircraft and the target aircraft when R-77 goes active by using an F-pole maneuver as illustrated above. The distance between one’s aircraft and the target when the an ARH goes active is termed A-pole. The time this takes to happen will obviously depend upon the distance between our aircraft and the target and time of missile launch—the shorter the distance the shorter the time to go active. If launched at RMAX, we can use as a general rule of thumb that an ARH will go active
approximately at one half the time of indicated missile time of flight indicated on the HUD. At fox, divide this number by two, and count to this number. At that point, one can generally assume that the missile has gone active, and it is safe to break lock if need be. The R-77 can be particularly effective in a situation where one needs to fire at long range (the R-77 has the third longest range next to R-27RE and TE), but also may need to go into the notch to defeat an incoming AAM once the R-77 has gone active.
The BVR heaters we have at our disposal in Flanker include the R-27T (AA-10B ALAMO) and R-27TE (AA-10D ALAMO). Unlike SARH and ARH AAMs, heaters only rely upon the infrared energy dissipated from the target aircraft once the missile has been fired. The great advantage of heaters is that they are truly fire-and-forget weapons. Unlike the R-77 where one must retain radar lock for at least a portion of missile flight--if fired from BVR ranges--, the R-27T/TE allow one to cease illuminating the target as soon as the missile leaves the rail. The combination of this fire-and-forget capability and its long range (equal to the R-27RE) makes the R-27TE the most lethal BVR missile available to us. Two advantages the R-27T/TE gives us is the ability to hit the notch without concern of continuing missile guidance and the ability to engage multiple targets at once. By locking, firing, unlocking and then repeating on follow-on targets, the R-27T/TE gives us true multi-target engagement capability.
Now that we have an understanding of the strengths and weaknesses of these various AAMs, it’s time to put all the pieces together. Lets say we have a loadout made up of R-27RE, R-77, R-27T, and R-73 and we are facing a equally armed bandit at 60km nose-on-nose. First off, do we decide to fire our big stick (ie R-27RE) at RMAX and pull an F-pole maximization maneuver? Or do we assume the other guy will do just that and thus we attempt a bait maneuver? Once we have fired off our R-27REs—be it after an F-pole maneuver or after a bait—we likely would have closed the range and have the option for either R-77 or R-27T shot. Do we choose to use the active radar homing capabilities of the R-77, or if we’re in range, do we cook off a couple of R-27Ts? What happens if we’re faced with a proximity warning before reaching RMAX for our next biggest "big stick"? Do we take the chance with a proximity hit and continue lock for a shot, or do we hit the notch? What I’m getting at here is that there is no proven successful pattern with any particular weapons loadout. It’s a dynamic series of decisions based upon an understanding of weapon capabilities, good situational awareness, sound understand of the "poles", and a little dumb luck.
Best of Luck.
Wags